Step-By-Step Instructions for Reporting an Invasive Plant Sighting
The basic information required: Who collected the data, Description of invasive species infestation, When and Where you collected the data and Images of the invasive species.
First time only: Register as an EDDMapS user.
- Go to the EDDMapS website (http://www.eddmaps.org)
- Select "Report Sightings" from the menu bar.
- Click the "Register Now" button.
- Fill out the form with your name, email address, etc.
- Click the "Submit" button. Your information can be easily changed or updated any time from your personal EDDMapS page.
Once you have registered for EDDMapS, you will simply sign in to report an infestation.
Who collected the data
From the EDDMapS website (http://www.eddmaps.org)
- Select Report Sightings from the menu bar.
- Log in under, Please Log In. You are now ready to begin the reporting procedure.
- Select the state for which you are reporting an infestation.
On the reporting form you will see a number of fields.
Note: If you place your cursor over a (?) at the end of each field on the form you will get a definition or more information about filling out that field. You might want to take a few minutes the first time you reach this page to explore the information available at each (?). This information answers the questions most often asked about filling out the form. Most of the fields have drop down menus with a list of possible choices for that field.
Description of invasive species infestation
- Pest Species: Click on the arrow on the right; you will find a dropdown menu to see the list of invasive species. If the species you have found is not listed, choose Other Species and add the name of the pest in the Comment text box below. If you are not sure what the species is, choose Unknown.
- Note: Species are listed in alphabetical order by scientific name, although the common name is also listed. You can click on the Species Information tab and then on Subject Name and the list will then alphabetize by common name.
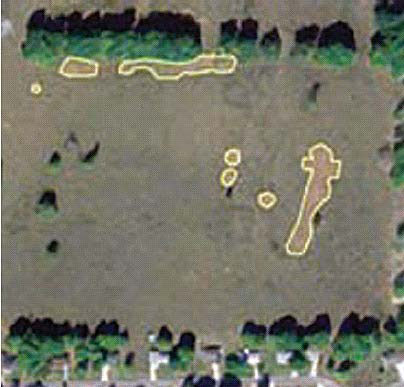
- Infested Area: Area of land containing one invasive species. An infested area of land is defined by drawing a line around the actual perimeter of the infestation as defined by the canopy cover of the invasive plants, excluding areas not infested. This can be done visually. Areas containing only occasional invasive plants per acre do not equal one acre infested. It is highly recommended that only a single invasive plant species be entered for each infested area. Choose the unit area from the drop down menu; choices are acres, hectares, square feet, or square meters.
- Gross Area: This field is intended to show general location and population information. Like Infested Area it is the area of land occupied by an invasive species. Unlike Infested Area, the area is defined by drawing a line around the general perimeter of the infestation not the canopy cover of the plants. The Gross Area may contain significant parcels of land that are not occupied by invasive plants. Again, choose the unit area from the drop-down menu.
- Note: The definitions for Infested and Gross Area are taken from the North American Weed Management Association guidelines in "North American Invasive Plant Mapping Standards".
In this example of a field infested with Cogongrass the Gross Area is the whole field. The cogongrass in the example is outlined and would be considered the Infested Area.
- Habitat: From the drop down menu, choose the description that best describes the habitat within which the invasive species occurs. If you do not see the appropriate habitat listed, choose Other and add any clarification needed in the Comment text box.
- Canopy Closure: Canopy closure is a way to estimate the amount or severity of an invasive plant infestation. Area tells you the extent of the population across the landscape. Canopy closure tells how that weed dominates the vegetation within that area. The greater the canopy cover the more of the invasive plants there are.
- Abundance/Density: Choose the most appropriate answer from the dropdown menu: Single Plant, Scattered Plants, Scattered Dense Patches, Dense Monoculture.
- Patch Type: A single plant or very small group is a point; an infestation along a fence line, river bank or road is a linear patch; a polygon is a shape with three or more sides, so it covers any other type of patch.
- Plant Description: Check each description which applies at the time you gather the data.
When you collected the data
- Observation Date: Enter the date you observed the pest species in the format mm/dd/yyyy.
Where you collected the data
- County: Choose the county where the invasive species was observed from the drop-down menu.
- Latitude/Longitude: Enter the Latitude and Longitude coordinates. Remember to put the negative sign in front of the Longitude coordinate to place your entry in the Western hemisphere.
Note: You can find the coordinates using a GPS unit at the site when you collect the data. Make sure you set your GPS unit to NAD83 or WGS84 and to decimal degrees.
Or...
You can select a location using the mapping tools on the form. Select Choose Location from Location Tools. A Google map will appear. Choose the normal map view, a satellite image, or a hybrid of the two. Click on the map in the general area of the infestation and you will see a pinpoint at that spot.
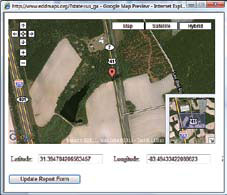
Increase the magnification of the point by clicking the plus (+) sign on the upper left hand corner of the map until you have zeroed in on the site where the infestation was found.
You can adjust the location of the pinpoint by clicking on the appropriate spot on the map. Each time you click, a new pinpoint will appear. When the pinpoint is in the correct spot, click on Update Report Form. You will see the correct latitude and longitude entered for you.
- Site Name: If desired, a descriptive name can be entered for the site; for example, Stone Mountain Park North Entrance.
- Ownership: From the drop-down menu, select the ownership type for the property on which the invasive plant was found.
Note: Remember, you need permission from landowners to be on private property.
- Location Description: Use this text box to add any information that would aid in relocating the infestation or to clarify any other entry.
- Comments: Add any additional comments related to the infestation.
- Identified by: Enter the name of the expert identifying the plant if someone else provided the identification.
Images of the Invasive Species

The next section of the online form allows you to upload images with your report. Good images are important and allow an expert to validate your entry by making a positive identification of genus and species.
- Image: Simply click Browse and navigate to the picture on your computer. Click Open and the image location will be entered for you. You can upload up to five images.
- Caption: Add a caption to describe each image. Provide as much detail as possible. Include the photographer's name if someone else took the picture.
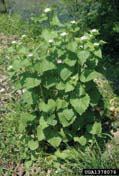
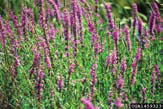
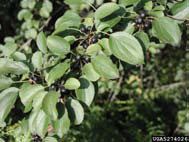
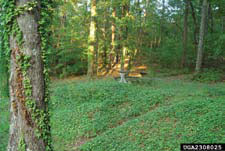
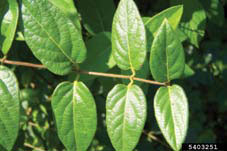
Note: Image recommendations include leaf shape and arrangement, flowers, fruit, roots, and unique features like thorns. Whole plant images showing the habit of the species are also appropriate when included with close-up images. Use a tripod when needed to reduce the motion of the camera. Take photos with the sun behind you.
Herbarium Specimen
The next section of the form allows you to provide information when you collect an herbarium specimen of an invasive plant.
- Voucher Specimen Made: If a voucher specimen was created from this sighting click Yes. The default setting is No.
- Herbarium holding specimen: Enter the name of the herbarium where the specimen is housed.
Note: See www.gainvasives.org/handbook/Herbaria.pdf for information on how to collect, prepare and submit an herbarium specimen. Herbarium specimens are not required for submitting data to EDDMapS. They add validity to the data submitted.
The last step is to click Report.
The data is now entered into EDDMapS and your images are uploaded. Congratulations! You have successfully completed an entry into EDDMapS.
Be sure to go to your personal EDDMapS page. This is where you can keep track of "Your Stats"; view, revisit or edit the data you have entered; view or edit your profile, as well as set up and manage alerts for invasive species.
The Tools and Training page has an excel worksheet for downloading batch data into EDDMapS. The instruction sheet for the template is located here as well. The Tools and Training page is also where you can download and print the forms for collecting data in the field. It is available as a pdf or word document so that you can edit it as needed for your data collection.